...If so, congrats! The following information will help you to answer an extra-credit question:
A gallon of emulsion costs $77.25
good luck! :)
Also:
You may use two papers DURING the quiz, to help you figure out the answers:
1. the burning demo worksheet (handed back Thursday)
2. your First Print Practice handout
...If you don't have one or both of those, and/or you want more info to help you understand concepts-- here are items that will help you study! The (correct answers to burning demo questions,) and the previous blogposts on burning (part ONE, part TWO, part THREE (incl. how to prep a burned screen)), the posts on printing (part ONE, and part TWO which includes how to clean) and you'll be just fine.

Thursday, October 26, 2017
Friday, October 20, 2017
PRINTING WITH OIL-BASED INK-- demo review, practice assignment, and how to print light onto dark!

In yesterday's 20-minute OIL-BASED INK demo, you learned some of the differences between oil-based and water-based ink, the main one being that oil-based ink requires HEAT to dry/cure fully, which affects a lot of different things:
* printing
* clean-up
* classroom cleanliness!
etc etc etc etc etc
Things I mentioned during the demo (and which were listed on the board)
---------------------------------------------------------------------------------------------
PRINTING ON A T-SHIRT REQUIRES:1. Specific layouts when burning a screen (where you expose the stencils)
2. Different registration steps
3. Special techniques when printing LIGHT ink onto DARK fabric, including use of the "FLASH DRYER" (!) (so exciting!! :)
4. Different CLEANING steps-- NO OIL SQUEEGEES IN THE SINK! etc etc etc etc etc
---------------------------------------------------------------------------------------------
TODAY, I showed you #3-- what YOU will do to PRACTICE printing with oil-based ink, on t-shirt fabric. Actually, a piece of a "test square", which is basically fake fabric that printing companies use for their t-shirt test prints... but it's similar to fabric. Mostly.
Anywayyyy....
info, review, and highlights...
1. You will practice printing oil-based ink with your LARGE VELLUM stencil. By that, I mean the stencil on your screen that was created from the large vellum positive of your sticker design. Mask off EVERYTHING on your screen (on the squeegee-side!) except for the Large Vellum stencil. TRUST ME! This will enable you to print two stencils, with different inks, without having to clean your screen in-between. Oil-based ink doesn't dry out-- you can leave ink on your screen and clean it another day-- and if you mask-it off correctly, you can print different colors without having to clean in-between! You'll see :). (I'll demonstrate this as prep before you do 'foil transfer printing')
 |
| a screen fully masked-off to print one stencil and keep the rest of the screen "clean" |
2. Oil-based ink squeegees have a softer blade than the ones we use for water-based ink. You can identify them by their color: dark blue for water-based, and yellow (or sometimes green) for oil-based. DON'T MIX THEM UP!

 |
| for now, or any time when some students are working with water-based ink, make sure you are using the correct one! |
3. Oil-based ink is easier to work with because it doesn't dry naturally, but a massive pain because of this, too-- because if it gets on a surface, it STAYS WET and will transfer onto another surface if touched-- like your hands, your substrate, and even your clothes. I'll show you how to (hopefully) get unwanted ink out of clothes/fabric substrates later, but if it gets on your skin while printing, etc, USE THE POWDERED SOAP IN THE SILVER DISPENSER. It's fantastic. It's called Boraxo, and gets most ink off of your skin, but especially oil-based (which isn't really affected by normal, liquid soap)

4. Oil-based ink is thicker than water-based. Some are extremely thick (depends on the color). You will use a craft stick to SCOOP out the ink from the tubs and put it on the screen (whereas you poured out the water-based ink, from jars, using the stick to help guide the ink).

5. You will first practice oil-based ink by printing three different ways on a piece of t-shirt "fabric". Instructions are up on the board, but the gyst of it is this:

Just one pull. Dry the ink in the conveyor dryer. The ink won't be completely opaque (if printing on a light substrate), and may look slightly faded (if printing on a dark substrate). This is because, when using oil-based ink, the first pull does not (usually) release all the ink from the stencil. It can be a desired, 'distressed'/worn look, but generally, you always want to make TWO strong pulls. So:

SECOND PRINT (middle, on the above example):
Make two strong pulls. (Remember-- NO BACK-FLOODING!) This will release all the ink from the stencil and make the ink more opaque than before. If you need to make a third pull, do so. Dry the ink in the conveyor dryer.

THIRD PRINT (right, on the above example):
Make two/three strong pulls, flash-dry, THEN print another layer, then put the whole thing through the conveyor dryer..
WHY??
If you're printing light ink on a darker fabric, the ink won't be opaque/true to color unless you flash-dry between layers. This is because the ink will just keep soaking through the fabric, it won't build up/get thick/be opaque (unless you're not printing correctly and the ink prints too thickly.
If, however, you FLASH-DRY after your first (two) pulls, this surface-dries the ink so that the next pull/layer will sit on TOP of that ink, and give it the desired opacity.
 |
| some inks are naturally more opaque than others, and you might not want/need to flash-dry between layers when printing your project(s) |
FLASH-DRYING is easy-- just requires placing the flash-dryer over your substrate, on the platen, for 30 seconds or so, until the ink is dry to the (careful) touch.
the DIFFICULTY comes in printing the next layer, after flash-drying...
you have to CHECK TO MAKE SURE THE SCREEN LINES UP WITH THE PRINTED INK, before you pull another print! If it doesn't line up PERFECTLY, in all areas of the stencil, you will end up printing a DOUBLE-IMAGE. Which very, very rarely actually looks good.

HOW DO YOU PREVENT THIS?
*1. make sure nothing moves, BEFORE you start printing: the screen should be tight, the platen tight, and the fabric substrate WELL-ADHERED with the red platen adhesive
*2. After flash-drying the first layer, CHECK to make sure the stencil lines up with the print, by lowering the screen and carefully pushing on the screen (like when you check the off-contact), to see if it lines up. Check ALL areas of the stencil.
*3. IF IT DOESN'T LINE UP PERFECTLY... figure out what moved. If it was the screen or platen, you can probably move it back into place.
*4. IF IT DOESN'T LINE UP PERFECTLY BECAUSE THE SUBSTRATE MOVED... Game over. Just have a less-opaque print, it'll be fine. DON'T PRINT THE NEXT LAYER IF IT DOESN'T LINE UP! *ALSO*-- get Miss Doezie for help before you give up, OR if you are unsure if it's lining up correctly.

*******************
AFTER YOU HAVE PRINTED, CLEAN YOUR SQUEEGEE
(cleaning instructions will be given a different day, before anyone starts printing. But if you're from the future and looking back, read on!)
**************************************
Follow instructions given for cleaning (more detailed instructions are found HERE)
You MUST clean your squeegee the same period you use it, so it's available for the next student's use.
You do NOT have to clean your screen right away, as the oil-based ink won't dry, BUT-- you DO need to scrape off the excess/usable ink and put it back in the tub (so it doesn't get gunky from the dust in the air)
And, for this practice exercise, DON'T clean your screen until you've printed the Foil Transfer as well... so that you can practice color-switching without cleaning.
REMINDERS...
 |
| Bean-E-Doo makes oil-based ink water-soluble |
 |
| instructions for cleaning are on the walls of the classroom and the sink room |
 |
| FOLLOW ALL POSTED SIGNS!!! |
Friday Treat Challenge!!
Want one of these??

Then, as a follow-up to the Wednesday College Shirt Day discussion...
be one of the first TEN* to properly identify at least THREE of these five famous people who attended Miss Doezie's university! (BYU)
Answer what it asks below... Write answers down on a piece of scratch paper! GOOD LUCK!!
*if only five people come up, you'll split the ten cookies! :) so... DON'T TELL ANYONE ELSE ABOUT IT! Either they read the board, or they didn't! And don't tell other classes!!
#1
 |
| (the actor's name, and the name of this character!) |
#2
 |
| (the name and which political party!) |
#3
 |
| (the athlete and the name of the football team!) |
#4
 |
| (the author of the series and how many books in the series!) |
#5
 |
| (the actor's name, and the name of this movie!) |
Friday, October 13, 2017
TYPO-GRAPHIC TEE - rough draft worksheet
...You got this rough draft sheet today. I'll (probably) (maybe) be posting more about the design guidelines, but if you LOST the handout,
(in PDF format, as usual, so that you can print it out for yourself. -NOT in class, though)
DON'T START DRAWING ON THE T-SHIRTS (on the handout) RIGHT AWAY!
First, BRAINSTORM IDEAS. Read through the guidelines and decide what direction you want to go it (typographic illustration, or a design made up of type and graphics, etc)
Then, decide which idea you want to go with. Now, read more of the instructions :) (like, your choices for # of ink colors, maximum size of stencils, etc), and sketch it as a little rough draft onto the shirt outlines of the handout.
* remember that just because the blank tshirt is short-sleeved doesn't mean yours has to be! Could be long sleeve, tank top, sweatshirt, etc
* you don't need to have an extremely detailed drawing, nor should it be so simple or rapidly drawn that I can't tell what it is... because
the purpose of this handout is so that I can SEE what you want to create, so your concept/creation can be APPROVED before you move onto making the artwork!
* also remember: your artwork for this tshirt design can be drawn by hand, created on software, or both (again... read your handout! :)
DON'T START DRAWING ON THE T-SHIRTS (on the handout) RIGHT AWAY!
First, BRAINSTORM IDEAS. Read through the guidelines and decide what direction you want to go it (typographic illustration, or a design made up of type and graphics, etc)
Then, decide which idea you want to go with. Now, read more of the instructions :) (like, your choices for # of ink colors, maximum size of stencils, etc), and sketch it as a little rough draft onto the shirt outlines of the handout.
* remember that just because the blank tshirt is short-sleeved doesn't mean yours has to be! Could be long sleeve, tank top, sweatshirt, etc
* you don't need to have an extremely detailed drawing, nor should it be so simple or rapidly drawn that I can't tell what it is... because
the purpose of this handout is so that I can SEE what you want to create, so your concept/creation can be APPROVED before you move onto making the artwork!
* also remember: your artwork for this tshirt design can be drawn by hand, created on software, or both (again... read your handout! :)

Wednesday, October 4, 2017
Printing Basics Part Two: "First Print Practice", and How to Clean Water-Based Ink
* your first printing assignment is to:
[PRACTICE PRINTING your STICKER (rubylith) STENCIL with WATER-BASED INK]
* Today, you received a handout to help you with your first print practice:
First Print Practice (Handout) - 2 pages
(if you lose your handout, you can print a new one from this pdf)
(you will need your handout in order to receive points, by the way! -earning up to 25 points for successful first prints! 10 points for printing, 10 for cleaning, and 5 for properly using/filling out the handout...)
and the steps for this exercise were demonstrated last friday, including how to clean!
Because BEFORE you can print with water-based ink, you must first know:
* * *
Water-based ink has its pros and cons... one of the pros is that it's much easier to clean than oil-based ink; it rinses off the screen with just water, whereas you have to scrub a cleaning solvent into oil-based ink before it can be rinsed off.
Because this ink is water-based, though, it will dry in normal air temps... which means it has to be cleaned off right away, before it can dry on the screen or squeegee (at which point it's very difficult to remove and/or can damage or even ruin a screen).
HOW TO CLEAN:
As soon as you've finished printing,
1. PUT NEWSPAPER ON PLATEN
Immediately place a piece of NEWSPAPER (or blank newsprint, if we're out of newspaper) on the platen under the screen/stencil
2. SPRAY STENCIL WITH WATER MIX
Spray the inky stencil with the blue WATER MIX (mix of glass cleaner and water, in a spray bottle). This keeps the ink in the stencil from drying out while you're doing the first cleaning steps
3. REMOVE EXCESS INK FROM SCREEN
Put leftover, unused (uncontaminated-- not mixed with other colors, dried out, etc) ink back into the jar, using the INK CARDS. Scrape the ink from your squeegee blade into the jar using gravity; scoop up the ink from your screen with two cards, using two hands (as the ink can be kind of runny).
Removing excess ink from the screen and squeegee saves usable ink, AND makes cleanup easier.
4. CLEAN THE SQUEEGEE
Clean your squeegee in the little sink in the MAIN ROOM (not the sink room), using a rag. (If you just rinse it, it takes forever and wastes water; much faster to wipe with a rag). The rag will look gross but it's just stained :); if ink gets on your hands, just rinse or wash them off.
Make sure to wipe off all five sides of the squeegee blade! plus the handle of the squeegee if necessary.
Rinse and squeeze out the rag for the next person, and put the squeegee in a rack to air-dry. DO NOT DRY IT with paper towels!
5. REMOVE TAPE FROM SCREEN
Peel off the tape on the print and squeegee-sides, also the masked-off area. Ball up and throw away;
(the cleanest and best way to do this is to "drop" the tape web onto a piece of newsprint so that it sticks to it; then use the newsprint to ball up around the tape, keeping your hands clean and the trash can from being taped shut!!)
6. CLEAN THE SCREEN
Put the screen in one of the large sinks and rinse off with water until there is no wet ink left. This should only take twenty seconds or so, maybe even less.
TIP: IF THERE IS A LINE FOR THE LARGE SINK/HOSE, after removing the excess ink and putting it back in the jar, SPRAY YOUR ENTIRE SCREEN WITH WATER MIX, TO KEEP THE REMAINING INK FROM DRYING OUT WHILE YOU WAIT...
If you see ink on the emulsion of your screen after rinsing it well, check to see if it's wet or not (if it comes off on your finger when you touch it); if it's dried and staining the emulsion, it will not affect your printing (and will come off later when you 'reclaim' the screen).
If you see ink in the stencil, hold it up to the light... if the ink/color "disappears" with light shining through it, then it's just staining the mesh and won't affect your printing (and will come off during the reclaiming process, later).
If the ink blocks the light, it needs to be scrubbed out so that it doesn't block the stencil for your next print. If there are areas that don't rinse off easily, HELP THEM OUT BY WIPING WITH A CLOTH RAG! And remember to rinse off the FRAME, as well... and the inside corners of the frame.. basically the whole screen!
6. PUT YOUR SCREEN IN A RACK TO DRY
if it's the end of the period and still dripping-wet, put it on a bottom rack space (move other screens up, as necessary) so it doesn't drip onto a dry screen. Otherwise, wait until it's partially dry before putting it in a rack. If you want to speed up the drying process so you can tape-off and mask-off for the next day, set it outside in the sun for a bit, or use the air compressor.
* * * * *
[PRACTICE PRINTING your STICKER (rubylith) STENCIL with WATER-BASED INK]
* Today, you received a handout to help you with your first print practice:
First Print Practice (Handout) - 2 pages
(if you lose your handout, you can print a new one from this pdf)
(you will need your handout in order to receive points, by the way! -earning up to 25 points for successful first prints! 10 points for printing, 10 for cleaning, and 5 for properly using/filling out the handout...)
and the steps for this exercise were demonstrated last friday, including how to clean!
Because BEFORE you can print with water-based ink, you must first know:
* * *
how to clean your screen and squeegee
of water-based ink
* * *
Water-based ink has its pros and cons... one of the pros is that it's much easier to clean than oil-based ink; it rinses off the screen with just water, whereas you have to scrub a cleaning solvent into oil-based ink before it can be rinsed off.
Because this ink is water-based, though, it will dry in normal air temps... which means it has to be cleaned off right away, before it can dry on the screen or squeegee (at which point it's very difficult to remove and/or can damage or even ruin a screen).
YOU MUST ALWAYS GAUGE (calculate and plan for) THE AMOUNT OF TIME NEEDED FOR CLEANING
In other words: before you start printing, make sure that you have enough time to fix any mistakes that may happen AND have sufficient clean-up time when you're done (which may be more than five minutes, especially if there's a line for the sinks...)
HOW TO CLEAN:
As soon as you've finished printing,
1. PUT NEWSPAPER ON PLATEN
Immediately place a piece of NEWSPAPER (or blank newsprint, if we're out of newspaper) on the platen under the screen/stencil
2. SPRAY STENCIL WITH WATER MIX
Spray the inky stencil with the blue WATER MIX (mix of glass cleaner and water, in a spray bottle). This keeps the ink in the stencil from drying out while you're doing the first cleaning steps
3. REMOVE EXCESS INK FROM SCREEN
Put leftover, unused (uncontaminated-- not mixed with other colors, dried out, etc) ink back into the jar, using the INK CARDS. Scrape the ink from your squeegee blade into the jar using gravity; scoop up the ink from your screen with two cards, using two hands (as the ink can be kind of runny).
Removing excess ink from the screen and squeegee saves usable ink, AND makes cleanup easier.
4. CLEAN THE SQUEEGEE
Clean your squeegee in the little sink in the MAIN ROOM (not the sink room), using a rag. (If you just rinse it, it takes forever and wastes water; much faster to wipe with a rag). The rag will look gross but it's just stained :); if ink gets on your hands, just rinse or wash them off.
Make sure to wipe off all five sides of the squeegee blade! plus the handle of the squeegee if necessary.
Rinse and squeeze out the rag for the next person, and put the squeegee in a rack to air-dry. DO NOT DRY IT with paper towels!
5. REMOVE TAPE FROM SCREEN
Peel off the tape on the print and squeegee-sides, also the masked-off area. Ball up and throw away;
NO SPIDERWEBBING the trashcans!!!
(the cleanest and best way to do this is to "drop" the tape web onto a piece of newsprint so that it sticks to it; then use the newsprint to ball up around the tape, keeping your hands clean and the trash can from being taped shut!!)
6. CLEAN THE SCREEN
Put the screen in one of the large sinks and rinse off with water until there is no wet ink left. This should only take twenty seconds or so, maybe even less.
TIP: IF THERE IS A LINE FOR THE LARGE SINK/HOSE, after removing the excess ink and putting it back in the jar, SPRAY YOUR ENTIRE SCREEN WITH WATER MIX, TO KEEP THE REMAINING INK FROM DRYING OUT WHILE YOU WAIT...
If you see ink on the emulsion of your screen after rinsing it well, check to see if it's wet or not (if it comes off on your finger when you touch it); if it's dried and staining the emulsion, it will not affect your printing (and will come off later when you 'reclaim' the screen).
 |
| normal water-based ink staining after proper cleaning |
If you see ink in the stencil, hold it up to the light... if the ink/color "disappears" with light shining through it, then it's just staining the mesh and won't affect your printing (and will come off during the reclaiming process, later).
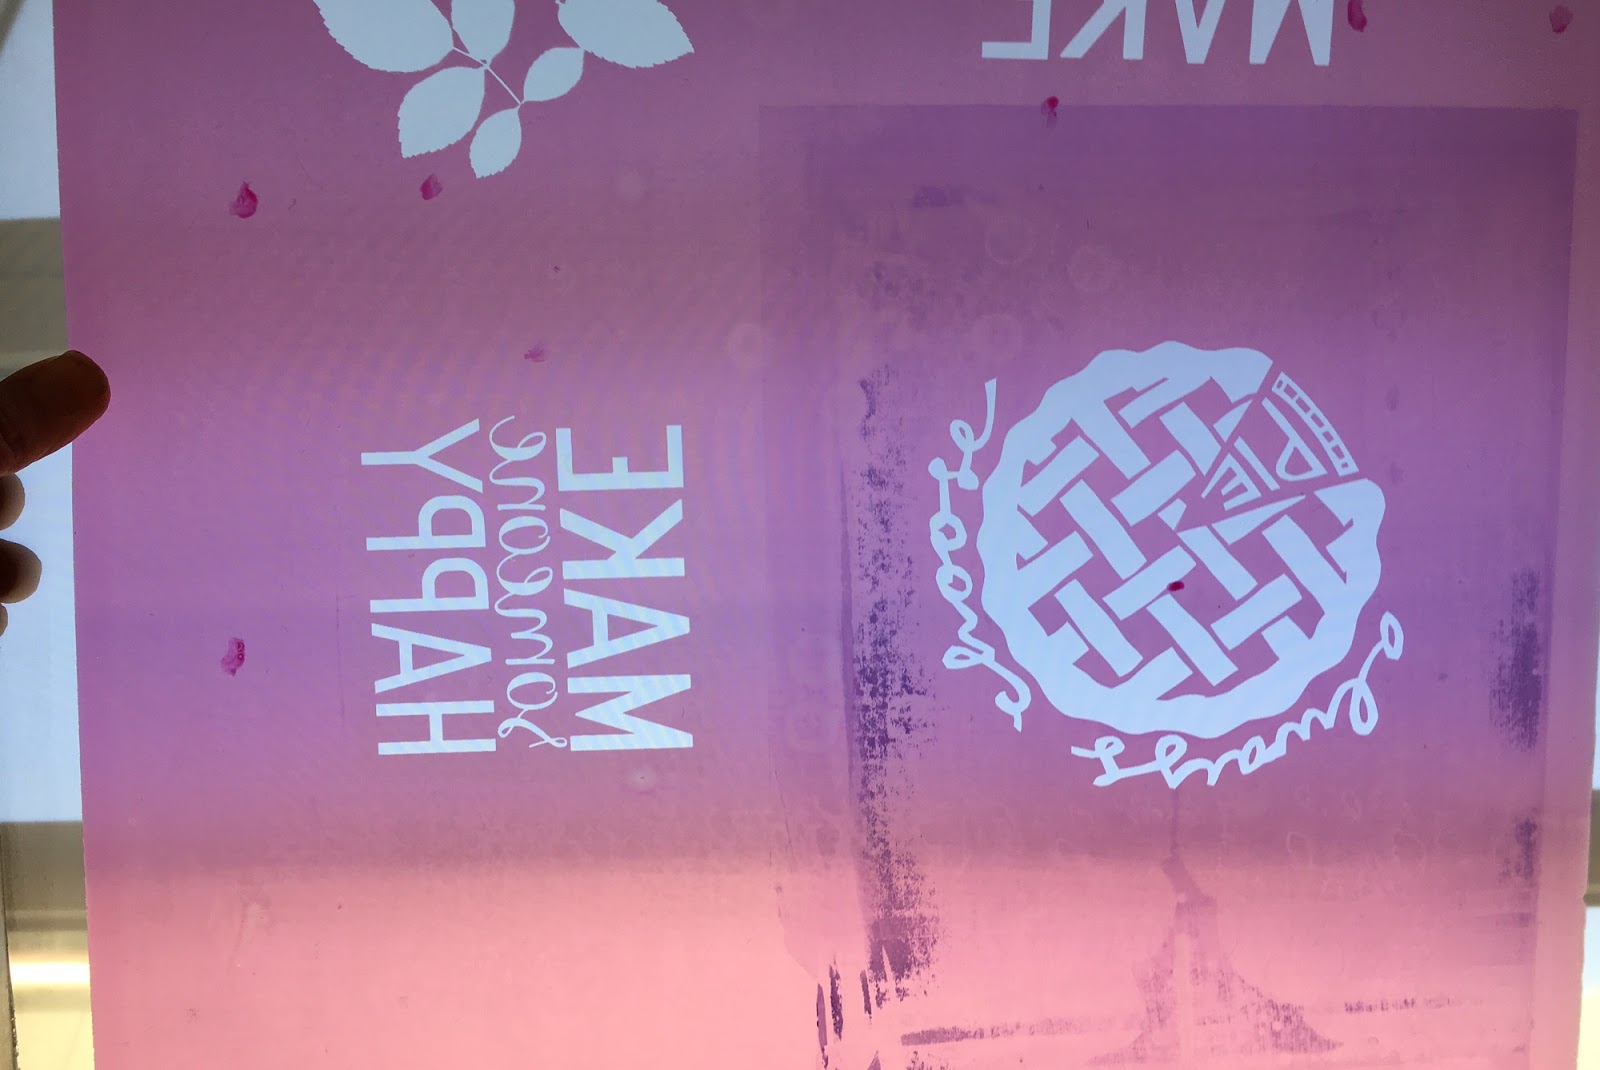 |
| no ink is blocking the stencil; therefore it has been cleaned/washed out properly |
If the ink blocks the light, it needs to be scrubbed out so that it doesn't block the stencil for your next print. If there are areas that don't rinse off easily, HELP THEM OUT BY WIPING WITH A CLOTH RAG! And remember to rinse off the FRAME, as well... and the inside corners of the frame.. basically the whole screen!
if light can go through, ink can go through...
and if the light is blocked, ink won't go through when printing!
and if the light is blocked, ink won't go through when printing!
If there are areas that don't rinse off easily, HELP THEM OUT BY WIPING WITH A CLOTH RAG! And remember to rinse off the FRAME, as well... and the inside corners of the frame.. basically the whole screen!
6. PUT YOUR SCREEN IN A RACK TO DRY
if it's the end of the period and still dripping-wet, put it on a bottom rack space (move other screens up, as necessary) so it doesn't drip onto a dry screen. Otherwise, wait until it's partially dry before putting it in a rack. If you want to speed up the drying process so you can tape-off and mask-off for the next day, set it outside in the sun for a bit, or use the air compressor.
* * * * *
Tuesday, October 3, 2017
HELVETICA!!
.
Is it? Is it the greatest typeface ever? Well, if greatest is measured by most-used… Then, probably still not. I'm sure Times New Roman is used the most, at least in the western world. Also, if we're measuring Greatness by how often it's used, then Comic Sans and Papyrus would also be in the running, and you know how I feel about those horrors. And you're going to hear more.


I like to call Arial, "poor man's Helvetica". I don't know if that phrase even makes any sense, but it feels like it does. Maybe I heard it somewhere. Probably from a genius, because I say genius things.
I'm not the only person on Team Helvetica, though--

 |
| it sounds like a cheer. Helvetica!! |
Still, Helvetica is quite widely-used... "ubiquitous"...
and it has a rich history and inception…
The digital version of Helvetica that everyone knows and uses today is quite different from the typeface’s pre-digital design from 1957. Originally released as Neue Haas Grotesk, many of the features that made it a Modernist favorite have been lost in translation over the years from one typesetting technology to the next.
(source: click here)
 |
| hahahaha |
… and though it's often confused with another SANS SERIF font, Arial, there are differences:
I like to call Arial, "poor man's Helvetica". I don't know if that phrase even makes any sense, but it feels like it does. Maybe I heard it somewhere. Probably from a genius, because I say genius things.
I'm not the only person on Team Helvetica, though--
Friday, September 29, 2017
Water-Based Ink Printing Basics -- tools, terms, and techniques!
On the board for Friday's print demo...
APRON
NEWSPRINT
SUBSTRATE
CRAFT STICK
WATER-BASED INK
"INK-FREE ZONE"
PLATEN
PRINTING STATIONS/PRESS/HINGE
"OFF-CONTACT DISTANCE"
ARTWORK POSITIVE
REGISTRATION
REGISTRATION MARKS
SPRAY ADHESIVE
"HAIRSPRAY CLOUD"
SQUEEGEE/SQUEEGEE BLADE
"PULL A PRINT"
TEST PRINT
BACK-FLOOD
SUBSTRATE PRINT
CONVEYOR DRYER
NEWSPRINT
WATER MIX
INK CARD
NO SPIDERWEBBING!
These are basic screen printing terms. tools, practices, and skills you will need to know! They may be unfamiliar now, but they'll become part of your screen printing vernacular (vocabulary) quite quickly. (And if they remain unfamiliar to you... it's going to be difficult the whole year!)
If you missed today's demo, or feel like you didn't fully grasp it... no worries! The first time you print, you'll have someone helping you! Not to mention a very comprehensive instruction sheet to help you along the way... and, of course, ME! Then you'll help someone else to print, and that will help you to learn as well!
in the near future, there will be a simple quiz on burning, printing, and cleaning basics. You will have your burning demo worksheet (and the blog!) as a reminder for the burning terms and processes, and if
Tuesday, September 26, 2017
HOW TO PREP YOUR BURNED SCREEN, plus more Exposing/Developing etc TIPS (*Screen Burning PART THREE)
 |
| tools for fixing "pinholes", to prep a burned screen for printing |
1. TIPS for exposing and developing, plus instructions on how to get your artwork photocopied onto vellum
2. proper LAYOUT of positives when exposing including how to do it for this first screen burning, when you have to place three positives
3. HOW TO PREP A BURNED SCREEN for printing-- Fixing pinholes, taping-off, and masking-off
4. different kinds of "POSITIVES"and what THREE you need, to be ready to burn!
And how, when you are ready to burn, to come get the:
SCREEN BURNING CHECKLIST/INSTRUCTIONS
from me, to follow while burning! (with a partner!)
TIPS and HIGHLIGHTS:
VELLUM POSITIVES
-your artwork must be BLACK. However it looks in black, on white paper, is exactly how it will print! The artwork creates the vellum positive... which creates the stencil... which creates the print.
-TO MAKE A VELLUM POSITIVE OUT OF YOUR ARTWORK... put your originals/artwork into the "TO BE COPIED" folder in order to get in photocopied by me, onto vellum. Your name and period # should be on the front (unless there's no space). You will get it back in your period's "VELLUM COPIES" folder. Remove both the vellum and original artwork from the folder, you might need the original again to make another vellum copy.
GETTING SCREENS FILLED
-your screen must be DRY when it's put
Monday, September 25, 2017
CREATIVE FONT DESIGN
The design for the first T-SHIRT PROJECT is going to be based heavily on typography, which we will learn much about in the upcoming month! As an intro to this, you were given a worksheet of an assignment wherein you will develop your own cool/creative font. The worksheet is self-explanatory and the assignment should take AT LEAST a class period (and is worth 15 pts). If you lost the worksheet, you can print it out here (PRINT OUT AT HOME OR AT THE LIBRARY, NOT IN CLASS):
There are student examples posted in the classroom-- not for copying, but to show you successful effort, craftsmanship, etc. A SUCCESSFUL FONT WILL NOT RELY ON THE THICKNESS OF THE PEN/PENCIL... just because a pencil lead line is automatically a certain width when you write with it, doesn't mean your font should be that same width! BOLD up the lines, have VARYING width, etc...
Tuesday, September 19, 2017
SCREEN BURNING DEMO: PART TWO
Highlights from today's learning:
SINKROOM AND DARKROOM MINI-TOUR
You learned about the light switches etc that you'll use, and took a brief walk-through, so you could see where the magic happens, what the safelights look like, and see for yourself that the darkroom isn't covered with blood, it's drips of emulsion from when I fill the screens in there. Not blood. Not a murder scene.
STENCIL PLACEMENT
Your screen has 12x15 inches of usable space for stencils. All stencils must be (placed) at least TWO INCHES from the inside of the frame, or you won't be able to print successfully with them.
Some projects will dictate particular placement (organizing/layout) of where the stencils are within that usable space. IN GENERAL, though, when exposing, you want to place your positive so that it burns a stencil in the center of your screen. It should also be right-facing-- as in, not backwards. Face-up on the glass. As far as crooked or upside-down... no such thing when you're printing onto paper or sticker. Backwards, yes. That can be a problem. Unless it's required for a certain print technique. This is confusing I realize. It will all make sense with the printing demos!
BTW there is a little flashlight on the exposure table, which you can use to help you see the screen when you're in the darkroom.
EXPOSING
Make sure the door to the darkroom is closed while exposing a screen. HOWEVER, if someone comes inside and light comes in while they do, that's okay-- it's brief enough that it won't affect screens!
BUT MAKE SURE TO LEAVE CABINET DOORS CLOSED... the safelight is dim, yes, but unexposed emulsion will eventually be exposed by safelights as well, if the light shines on it long enough.
DEVELOPING
Make sure the MAIN LIGHT is off in the sink room before you bring your screen out to develop it!
Developing "stops" the exposure-- if you don't develop the emulsion with water, it will continue to expose if... exposed, to any light. When you develop, you wash out the unexposed areas of emulsion, to create a stencil.
Rubylith blocks the light the best, so those stencils will develop (wash out) the fastest.
my tips:
Get the screen wet on both sides, and then LET IT SOAK for a bit!! It will make the developing/washing out the stencils sooooo much easier.
If you're using the hose and there is a line of students waiting to develop, stop spraying for a second and LET THEM GET THEIR SCREENS WET! If their screens are soaking while waiting, it will make everyone's turn with the water go faster.
Use the FLAT NOZZLE on the coiled hose, for the easiest developing experience. It works the best. TRUST ME.
If the burning process is too loud/hurts your ears, come get earplugs from me!
BLASTING OUT THE RESIDUE
I also gave you instruction today on how to USE the AIR COMPRESSOR... how to turn it on, etc.. (there are labels on the air compressor to remind you of the steps!)
notes/tips/etc:
If it's not already outside, roll it carefully outside using the back door
Usually, YOU will not use the back door to access the air compressor; only if it's raining!
You have to let it fill with some air pressure before you start to 'spray'
It's easier to hold up your screen while spraying, so that you can see the droplets of moisture
You only have to clear out the stencil (of moisture/residue), BUT, if you are in a hurry to dry your screen (at any time-- to dry a stencil/photo-emulsion, or dry a fully "reclaimed" screen), you can use the air compressor. DON'T USE PAPER TOWELS TO DRY A SCREEN!!
Yes.. the air/nozzle leaks a little. That's why you have to let it build up a bit of pressure before you start spraying :)
DO NOT LEAVE THE AIR COMPRESSOR RUNNING UNLESS YOU ARE USING IT! Don't walk away from it unless you have turned it OFF!
SINKROOM AND DARKROOM MINI-TOUR
You learned about the light switches etc that you'll use, and took a brief walk-through, so you could see where the magic happens, what the safelights look like, and see for yourself that the darkroom isn't covered with blood, it's drips of emulsion from when I fill the screens in there. Not blood. Not a murder scene.
STENCIL PLACEMENT
Your screen has 12x15 inches of usable space for stencils. All stencils must be (placed) at least TWO INCHES from the inside of the frame, or you won't be able to print successfully with them.
Some projects will dictate particular placement (organizing/layout) of where the stencils are within that usable space. IN GENERAL, though, when exposing, you want to place your positive so that it burns a stencil in the center of your screen. It should also be right-facing-- as in, not backwards. Face-up on the glass. As far as crooked or upside-down... no such thing when you're printing onto paper or sticker. Backwards, yes. That can be a problem. Unless it's required for a certain print technique. This is confusing I realize. It will all make sense with the printing demos!
BTW there is a little flashlight on the exposure table, which you can use to help you see the screen when you're in the darkroom.
EXPOSING
Make sure the door to the darkroom is closed while exposing a screen. HOWEVER, if someone comes inside and light comes in while they do, that's okay-- it's brief enough that it won't affect screens!
BUT MAKE SURE TO LEAVE CABINET DOORS CLOSED... the safelight is dim, yes, but unexposed emulsion will eventually be exposed by safelights as well, if the light shines on it long enough.
DEVELOPING
Make sure the MAIN LIGHT is off in the sink room before you bring your screen out to develop it!
Developing "stops" the exposure-- if you don't develop the emulsion with water, it will continue to expose if... exposed, to any light. When you develop, you wash out the unexposed areas of emulsion, to create a stencil.
Rubylith blocks the light the best, so those stencils will develop (wash out) the fastest.
Get the screen wet on both sides, and then LET IT SOAK for a bit!! It will make the developing/washing out the stencils sooooo much easier.
If you're using the hose and there is a line of students waiting to develop, stop spraying for a second and LET THEM GET THEIR SCREENS WET! If their screens are soaking while waiting, it will make everyone's turn with the water go faster.
Use the FLAT NOZZLE on the coiled hose, for the easiest developing experience. It works the best. TRUST ME.
If the burning process is too loud/hurts your ears, come get earplugs from me!
BLASTING OUT THE RESIDUE
I also gave you instruction today on how to USE the AIR COMPRESSOR... how to turn it on, etc.. (there are labels on the air compressor to remind you of the steps!)
notes/tips/etc:
If it's not already outside, roll it carefully outside using the back door
Usually, YOU will not use the back door to access the air compressor; only if it's raining!
You have to let it fill with some air pressure before you start to 'spray'
It's easier to hold up your screen while spraying, so that you can see the droplets of moisture
You only have to clear out the stencil (of moisture/residue), BUT, if you are in a hurry to dry your screen (at any time-- to dry a stencil/photo-emulsion, or dry a fully "reclaimed" screen), you can use the air compressor. DON'T USE PAPER TOWELS TO DRY A SCREEN!!
Yes.. the air/nozzle leaks a little. That's why you have to let it build up a bit of pressure before you start spraying :)
DO NOT LEAVE THE AIR COMPRESSOR RUNNING UNLESS YOU ARE USING IT! Don't walk away from it unless you have turned it OFF!
Subscribe to:
Posts (Atom)